
I noticed that drones have become very popular for both business and personal use. When I say drones, I mean quadcopters. I admit, they’re pretty cool and fun to play with. They can take amazing videos and photos from high altitudes that would otherwise be difficult or costly. As cool as they are, the majority of the consumer market uses it for one purpose: a remote control camera. What a waste! These quadcopters are full of potential and all you can do with it is take high-tech selfies and spy on neighbors? Screw that. I’m going to get my hands on some drones and make them do more.
I researched drones from different manufacturers and decided to get the one that is most hacker-friendly: The Parrot AR Drone. The Parrot AR Drone isn’t the most expensive or fancy, but it packs the most punch in terms of hackability. Unlike the radio frequency channel drones (which do allow you to fly at greater distances), the AR Drone is one of few that operate over wifi signals. Why do I prefer wifi? This means that the drone acts as a floating wireless access point and signals are transmitted using TCP or UDP protocols which can be replicated with your laptop or any device that is capable of connecting to a wifi access point. Among the available wifi drones, I chose the Parrot AR Drone because (as far as I know) it is the only drone with a documented API and open source SDK for you engineers that would like to do more than take aerial photos of your roof.

A quick google search returned several AR Drone SDKs supporting a handful of different programming languages. Some are just wrappers around the official Parrot C SDK while others are a complete rewrite which directly calls the actual API (which is also well documented). This makes it much easier than I initially thought!
The first SDK I tried was python-ardrone which is written completely in Python. It’s actually very easy to use and even includes a demo script that allows you to manually control your drone with your computer keyboard. The only thing I disliked about it was its h264 video decoder. The included h264 video recorder pipes the h264 video stream to ffmpeg and waits for it to send raw frame data back. It takes that data and converts it into numPy arrays and then converts the numPy arrays into a PyGame surface. I had a hard time getting a video feed and when I got it, the feed was too slow to be of any use. I would love to play with it some more and figure out a fix for the video. Here is a video of me operating the drone using my laptop with the python-ardrone library.
The next SDK I tried was the AR Drone Autopylot. The Autopylot library is written in C and requires the official Parrot SDK, but provides you with a way to implement your own add-ons in C, Python, or Matlab. It also allows you to manually control your drone with a PS3 or Logitech gamepad. I’m not sure how I feel about this as I wish it would include a way to navigate your drone with a keyboard. However, the h264 video decoder works really well, and that’s the most important requirement for this project. Since Autopylot gives me a working video feed, that’s what I decided to work with.
As the first step to making an intelligent drone, I want to make my drone hover in the air and follow people. While this does not make my drone “intelligent”, the ability to apply computer vision algorithms plays a huge role in that. Thanks to friendly SDKs like Autopylot and python-ardrone, this is actually pretty simple.
You may or may not have read my old blog post, My Face Tracking Robot, but in that post, I describe how I made my OpenCV library based face-tracking robot (or turret). All I have to do is apply the same haar cascade and CV logic to the Python drone SDK and I’m done!
Here is my first implementation:
#!/usr/bin/python

# file: /opencv/face_tracker.py

import sys
import time
import math
import datetime
import serial
import cv

# Parameters for haar detection
# From the API:
# The default parameters (scale_factor=2, min_neighbors=3, flags=0) are tuned
# for accurate yet slow object detection. For a faster operation on real video
# images the settings are:
# scale_factor=1.2, min_neighbors=2, flags=CV_HAAR_DO_CANNY_PRUNING,
# min_size=<minimum possible face size

min_size = (20,20)
image_scale = 2
haar_scale = 1.2
min_neighbors = 2
haar_flags = 0

# For OpenCV image display
WINDOW_NAME = 'FaceTracker'

def track(img, threshold=100):
    '''Accepts BGR image and optional object threshold between 0 and 255 (default = 100).
       Returns: (x,y) coordinates of centroid if found
                (-1,-1) if no centroid was found
                None if user hit ESC
    '''
    cascade = cv.Load("haarcascade_frontalface_default.xml")
    gray = cv.CreateImage((img.width,img.height), 8, 1)
    small_img = cv.CreateImage((cv.Round(img.width / image_scale),cv.Round (img.height / image_scale)), 8, 1)

    # convert color input image to grayscale
    cv.CvtColor(img, gray, cv.CV_BGR2GRAY)

    # scale input image for faster processing
    cv.Resize(gray, small_img, cv.CV_INTER_LINEAR)

    cv.EqualizeHist(small_img, small_img)

    center = (-1,-1)
    #import ipdb; ipdb.set_trace()
    if(cascade):
        t = cv.GetTickCount()
        # HaarDetectObjects takes 0.02s
        faces = cv.HaarDetectObjects(small_img, cascade, cv.CreateMemStorage(0), haar_scale, min_neighbors, haar_flags, min_size)
        t = cv.GetTickCount() - t
        if faces:
            for ((x, y, w, h), n) in faces:
                # the input to cv.HaarDetectObjects was resized, so scale the
                # bounding box of each face and convert it to two CvPoints
                pt1 = (int(x * image_scale), int(y * image_scale))
                pt2 = (int((x + w) * image_scale), int((y + h) * image_scale))
                cv.Rectangle(img, pt1, pt2, cv.RGB(255, 0, 0), 3, 8, 0)
                #cv.Rectangle(img, (x,y), (x+w,y+h), 255)
                # get the xy corner co-ords, calc the center location
                x1 = pt1[0]
                x2 = pt2[0]
                y1 = pt1[1]
                y2 = pt2[1]
                centerx = x1+((x2-x1)/2)
                centery = y1+((y2-y1)/2)
                center = (centerx, centery)

    cv.NamedWindow(WINDOW_NAME, 1)
    cv.ShowImage(WINDOW_NAME, img)

    if cv.WaitKey(5) == 27:
        center = None
    return center

if __name__ == '__main__':

    capture = cv.CaptureFromCAM(0)

    while True:

        if not track(cv.QueryFrame(capture)):
            break
couple that script with this replacement autopylot_agent.py:
'''
Python face-tracking agent for AR.Drone Autopylot program...
by Cranklin (http://www.cranklin.com)

Based on Simon D. Levy's green ball tracking agent

    Copyright (C) 2013 Simon D. Levy

    This program is free software: you can redistribute it and/or modify
    it under the terms of the GNU Lesser General Public License as
    published by the Free Software Foundation, either version 3 of the
    License, or (at your option) any later version.

    This program is distributed in the hope that it will be useful,
    but WITHOUT ANY WARRANTY; without even the implied warranty of
    MERCHANTABILITY or FITNESS FOR A PARTICULAR PURPOSE.  See the
    GNU General Public License for more details.

 You should have received a copy of the GNU Lesser General Public License
 along with this program.  If not, see <http://www.gnu.org/licenses/>.
 You should also have received a copy of the Parrot Parrot AR.Drone
 Development License and Parrot AR.Drone copyright notice and disclaimer
 and If not, see
   <https://projects.ardrone.org/attachments/277/ParrotLicense.txt>
 and
   <https://projects.ardrone.org/attachments/278/ParrotCopyrightAndDisclaimer.txt>.
'''

# PID parameters
Kpx = 0.25
Kpy = 0.25
Kdx = 0.25
Kdy = 0.25
Kix = 0
Kiy = 0

import cv
import face_tracker

# Routine called by C program.
def action(img_bytes, img_width, img_height, is_belly, ctrl_state, vbat_flying_percentage, theta, phi, psi, altitude, vx, vy):

    # Set up command defaults
    zap = 0
    phi = 0
    theta = 0
    gaz = 0
    yaw = 0

    # Set up state variables first time around
    if not hasattr(action, 'count'):
        action.count = 0
        action.errx_1 = 0
        action.erry_1 = 0
        action.phi_1 = 0
        action.gaz_1 = 0

    # Create full-color image from bytes
    image = cv.CreateImageHeader((img_width,img_height), cv.IPL_DEPTH_8U, 3)
    cv.SetData(image, img_bytes, img_width*3)

    # Grab centroid of face
    ctr = face_tracker.track(image)

    # Use centroid if it exists
    if ctr:

        # Compute proportional distance (error) of centroid from image center
        errx =  _dst(ctr, 0, img_width)
        erry = -_dst(ctr, 1, img_height)

        # Compute vertical, horizontal velocity commands based on PID control after first iteration
        if action.count > 0:
            phi = _pid(action.phi_1, errx, action.errx_1, Kpx, Kix, Kdx)
            gaz = _pid(action.gaz_1, erry, action.erry_1, Kpy, Kiy, Kdy)

        # Remember PID variables for next iteration
        action.errx_1 = errx
        action.erry_1 = erry
        action.phi_1 = phi
        action.gaz_1 = gaz
        action.count += 1

    # Send control parameters back to drone
    return (zap, phi, theta, gaz, yaw)

# Simple PID controller from http://www.control.com/thread/1026159301
def _pid(out_1, err, err_1, Kp, Ki, Kd):
    return Kp*err + Ki*(err+err_1) + Kd*(err-err_1)

# Returns proportional distance to image center along specified dimension.
# Above center = -; Below = +
# Right of center = +; Left = 1
def _dst(ctr, dim, siz):
    siz = siz/2
    return (ctr[dim] - siz) / float(siz)
Now autopylot_agent simply looks for a “track” method that returns the center coordinates of an object (in this case, a face) and navigates the drone to follow it. If you noticed, I’m using the frontal face haar cascade to detect the front of a human face. You can easily swap this out for a haar cascade to a profile face, upper body, eye, etc. You can even train it detect dogs or other animals or cars, etc. You get the idea.
This works fine the way it is, however, I felt the need to improve upon the autopylot_agent module because I want the drone to rotate rather than strafe when following horizontal movement. By processing the “err_x” as a “yaw” rather than a “phi”, that can be fixed easily. Also, rather than just returning the centroid, I decided to modify it to return the height of the tracked object as well. This way, the drone can move closer to your face by using the “theta”.
On my first test run with the “theta” feature, the drone found my face and flew right up to my throat and tried to choke me. I had to recalibrate it to chill out a bit.
Here are a couple videos of my drones following me:
Remember… this is all autonomous movement. There are no humans controlling this thing!
You may think it’s cute. Quite frankly, I think it’s a bit creepy. I’m already deathly afraid of clingy people and I just converted my drone into a stage 5 clinger.
If you’re lonely and you want your drone to stalk you (if you’re into that sort of thing), you can download my the face tracking agent here… but be sure to download the ARDroneAutoPylot SDK here.
This is just the first step to making my drone more capable. This is what I’m going to do next:
- process voice commands to pilot the drone (or access it through Jarvis)
- teach the drone to play hide and seek with you
- operate the drone using google glass or some other FPV
- operate the drone remotely (i.e. fly around the house while I’m at the office)
With a better drone and frame, I’d like to work on these:
- arm it with a nerf gun or a water gun
- have it self-charge by landing on a charging landing pad
I’m also building a MultiWii based drone and, in the process, coming up with some cool project ideas. I’ll keep you updated with a follow-up post when I have something. 🙂
I apologize. It has been too long. I took a long break from blogging because I was busy and burnt out. Without getting into too much detail as to why I felt burnt out, I shall briefly state that working with a couple incompetent partners back to back is enough to burn anybody out. After witnessing all the drama, the greed, the deception, and even the swindling of company funds, I have had enough. I would rather jump back into a 9 to 5 and earn a steady, comfortable paycheck.
…which is exactly what I did. I even worked briefly at a large .NET shop staying under the radar and coding quietly in C#. That’s how bad it was; I worked at a Microsoft shop.
I tried everything to recover from this burnout, short of changing careers.
During these times, one major activity I picked up to assist in my recovery and escape from my stresses was sporting clays. For those that aren’t familiar with sporting clays, it is a challenging (but fun and addicting) shotgun shooting sport that began as simulated hunting. Unlike skeet and trap, sporting clays requires the shooter to migrate from station to station (usually 10 or more stations) either on foot or golf cart. At each station there are a pair of clay throwers that throw clay targets in a wide variety of presentations. No two stations are alike, and the shooter must shoot each pair as either a true pair (two targets at once) or a report pair (one target first, second target immediately after the first shot). The targets can fly overhead, come towards you, drop, cross, roll, etc. Scores are kept and represented as number of total targets broken. The easiest way to describe this sport is “golf with a shotgun”. It’s no wonder sporting clays is currently the fastest growing shooting sport.


You’re probably wondering why I’m talking about shooting. Well, as I became more involved in the sport, I began to analyze the targets in order to improve my score. It turns out to be a very fun problem to solve which involves a bit of trigonometry, physics, and software engineering.
Let’s begin with the knowns. A shooter is typically firing 1 oz or 1 1/8 oz of lead (7 1/2 or 8 shot) downrange at anywhere from 1100 to 1300 feet per second. The clay targets are typically thrown at 41 mph but can vary. Rarely, targets can be launched at blazing speeds up to 80 mph. The direction and position of the clay throwers are always different, but shots are usually expected to be taken in the 20-50 yard range. On occassion, you may be expected to take an 80 yard shot (or further) but that would be extremely rare. The “breakpoint” is where the shot meets the target and breaks the target.
Since we’re not shooting laser rifles, there’s a certain amount of “lead” seen by the shooter or else he/she would be missing from behind. So how do we calculate this lead?
I consider there to always be two different types of leads: the actual lead (how far ahead the pattern actually needs to be) and the visual lead (how the lead appears to the shooter from the shooter’s perspective)
For example, if a target was a straightaway target, all we would have to do is shoot right at it, making the “actual lead” unimportant and the “visual lead” non-existent. If a target was a 90 degree crosser, perfectly perpendicular to the gun’s shot path, that would simply require a conversion of miles per hour to feet per second (5280 feet = 1 mile) and determining how much quicker the shot pattern reaches the breakpoint before the clay target. But of course, nothing is this simple. The truth is, breakpoints vary, angles vary, distances vary, velocities vary, thus leads vary. Even the same target thrown from the same machine will have a different lead depending on where in its flight path you decide to shoot it.
This is how I began to tackle the problem:

1) I visualize the different points. S = shooter, T = thrower, B = breakpoint, P = target location.

2) I determine the distance between shooter and the breakpoint.

3) I determine the shooter’s angle between the breakpoint and the target location… in other words, the lead in degree angles
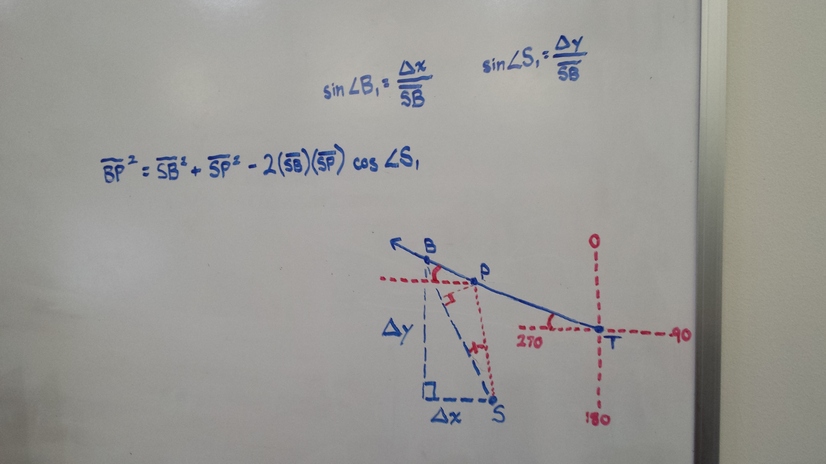
4) I determine the distance (actual lead).

5) I determine the visual lead which is actually just an adjacent side to the right angle of the triangle and opposite to the lead in degree angles.
6) I code this up using Python
Here is my implementation:
from __future__ import division
import math

class UnitConversionsMixin(object):
    '''
    Unit conversion calculations
    5280 feet = 1 mile
    '''

    @classmethod
    def fps_to_mph(cls, fps):
        '''
        converts fps to mph
        '''
        return (fps / 5280) * 3600

    @classmethod
    def mph_to_fps(cls, mph):
        '''
        converts mph to fps
        '''
        return (mph * 5280) / 3600

    @classmethod
    def angle_to_thumbs(cls, angle):
        '''
        converts degree angle to thumbs.
        this method assumes the average human thumb width is approximately 2 degrees
        '''
        return angle / 2


class TrigonometryMixin(object):
    '''
    Trigonometric calculations
    '''

    @classmethod
    def angle_by_sides(cls, a, b, c):
        # applies law of cosines where we are trying to return the angle C (opposite corner of c)
        cos_C = (c**2 - b**2 - a**2) / (-2 * a * b)
        C = math.acos(cos_C)
        return math.degrees(C)

    @classmethod
    def side_by_angles_and_side(cls, a, angle_a, angle_b):
        # applies law of sines where we are trying to return the side b (opposit corner of angle B)
        b = (math.sin(math.radians(angle_b)) * a) / math.sin(math.radians(angle_a))
        return b


class Shooter(object):
    '''
    Represents a shooter
    '''
    velocity = 1200  # velocity of shotshell in feet per second
    position = (0,0)  # position of shooter in cartesian coordinates (x,y).  This should always be (0,0)
    direction = 0  # direction in which the station is pointing in degree angle 0 = 360 = 12 o'clock. 90 = 3 o'clock. 180 = 6 o'clock. 270 = 9 o'clock.

    def __init__(self, velocity=1200, direction=0):
        self.velocity = velocity


class Thrower(object):
    '''
    Represents a thrower
    '''
    position = (0,0)  # position of thrower in cartesian coordinates (x,y) where each unit of measurement is in feet
    velocity = 41  # velocity of clay targets in miles per hour
    direction = 0  # direction of clay target trajectory in degree angle 0 = 360 = 12 o'clock. 90 = 3 o'clock. 180 = 6 o'clock. 270 = 9 o'clock.
    destination = (40,40) # position of destination of target in cartesian coordinates (x,y) where each unit of measuremnt is in feet

    def __init__(self, position, direction=None, destination=None, velocity=41):
        self.position = position
        self.direction = direction
        self.velocity = velocity
        self.destination = destination
        if not self.velocity and not self.destination:
            raise Exception('You must specify either a direction (angle) or destination (end position)')
        if direction is None:
            self.direction = self.destination_to_direction(destination)

    def direction_to_destination(self, direction, distance=100, offset=None):
        #import ipdb; ipdb.set_trace()
        hypotenuse = distance
        if offset is None:
            offset = self.position
        if direction > 270:
            # quadrant IV
            angle = 360 - direction
            rads = math.radians(angle)
            y_diff = math.cos(rads) * hypotenuse
            x_diff = math.sin(rads) * hypotenuse * -1
        elif direction > 180:
            # quadrant III
            angle = direction - 180
            rads = math.radians(angle)
            y_diff = math.cos(rads) * hypotenuse * -1
            x_diff = math.sin(rads) * hypotenuse * -1
        elif direction > 90:
            # quadrant II
            angle = 180 - direction
            rads = math.radians(angle)
            y_diff = math.cos(rads) * hypotenuse * -1
            x_diff = math.sin(rads) * hypotenuse
        else:
            # quadrant I
            angle = direction
            rads = math.radians(angle)
            y_diff = math.cos(rads) * hypotenuse
            x_diff = math.sin(rads) * hypotenuse
        return (round(x_diff + offset[0], 2), round(y_diff + offset[1], 2))

    def destination_to_direction(self, destination):
        x_diff = destination[0] - self.position[0]
        y_diff = destination[1] - self.position[1]
        hypotenuse = math.sqrt(x_diff**2 + y_diff**2)
        cos_angle = abs(y_diff) / hypotenuse
        angle = math.degrees(math.acos(cos_angle))
        if x_diff >= 0:
            if y_diff >= 0:
                # quadrant I
                direction = angle
            else:
                # quadrant II
                direction = 180 - angle
        else:
            if y_diff >= 0:
                # quadrant IV
                direction = 360 - angle
            else:
                # quadrant III
                direction = 180 + angle
        return direction


class LeadCalculator(UnitConversionsMixin, TrigonometryMixin):
    '''
    Lead Calculator class
    '''

    @classmethod
    def _get_angle_by_sides(cls, a, b, c):
        # applies law of cosines where e are trying to return the angle C (opposite of side c
        cos_C = (c**2 - b**2 - a**2) / (-2 * a * b)
        C = math.acos(cos_C)
        return math.degrees(C)

    @classmethod
    def lead_by_breakpoint_location(cls, shooter, thrower, breakpoint):
        # breakpoint location in cartesian coordinates tuple(x,y)

        # find breakpoint distance from shooter
        shot_x_diff = breakpoint[0] - shooter.position[0]
        shot_y_diff = breakpoint[1] - shooter.position[1]
        shot_distance = math.sqrt(shot_x_diff**2 + shot_y_diff**2)
        shot_time = shot_distance / shooter.velocity
        target_diff = cls.mph_to_fps(thrower.velocity) * shot_time

        # reverse direction
        reverse_direction = (thrower.direction + 180) % 360
        target_location = thrower.direction_to_destination(reverse_direction, target_diff, breakpoint)

        # find target distance from shooter at moment of trigger pull
        pull_x_diff = target_location[0] - shooter.position[0]
        pull_y_diff = target_location[1] - shooter.position[1]
        target_distance = math.sqrt(pull_x_diff**2 + pull_y_diff**2)

        # find lead in angle
        lead_angle = cls._get_angle_by_sides(shot_distance, target_distance, target_diff)

        # find lead in thumb widths
        lead_thumbs = cls.angle_to_thumbs(lead_angle)

        # find visual lead in ft
        visual_lead_ft = target_distance * math.sin(math.radians(lead_angle))

        return {
            'lead_ft': round(target_diff, 2),
            'lead_angle': round(lead_angle, 2),
            'lead_thumbs': round(lead_thumbs, 2),
            'visual_lead_ft': round(visual_lead_ft, 2),
            'breakpoint': breakpoint,
            'pullpoint': target_location,
            'shot_distance': round(shot_distance, 2),
            'target_distance': round(target_distance, 2),
            'trajectory': round(thrower.direction, 2)
        }

    @classmethod
    def lead_by_shooter_angle(cls, shooter, thrower, shot_angle):
        # shooter angle in degrees 0 = 360 = 12 o'clock. 90 = 3 o'clock. 180 = 6 o'clock. 270 = 9 o'clock

        # find distance from shooter to thrower
        delta_x = thrower.position[0] - shooter.position[0]
        delta_y = thrower.position[1] - shooter.position[1]
        thrower_shooter_distance = math.sqrt(delta_x**2 + delta_y**2)

        # find angle to thrower
        cos_angle = abs(delta_y) / thrower_shooter_distance
        angle_to_thrower = math.degrees(math.acos(cos_angle))
        if delta_x >= 0:
            if delta_y >= 0:
                #quadrant I
                pass
            else:
                #quadrant II
                angle_to_thrower = 180 - angle_to_thrower
        else:
            if delta_y >= 0:
                #quadrant IV
                angle_to_thrower = 360 - angle_to_thrower
            else:
                #quadrant III
                angle_to_thrower = 180 + angle_to_thrower

        # find broad shooter angle
        broad_shooter_angle = abs(angle_to_thrower - shot_angle)

        # find broad thrower angle
        thrower_to_shooter_angle = (angle_to_thrower + 180) % 360
        broad_thrower_angle = abs(thrower.direction - thrower_to_shooter_angle)

        # find broad breakpoint angle
        broad_breakpoint_angle = 180 - (broad_thrower_angle + broad_shooter_angle)

        # get breakpoint distance from shooter
        shot_distance = cls.side_by_angles_and_side(thrower_shooter_distance, broad_breakpoint_angle, broad_thrower_angle)

        # get breakpoint distance from thrower
        breakpoint_distance_from_thrower = cls.side_by_angles_and_side(thrower_shooter_distance, broad_breakpoint_angle, broad_shooter_angle)

        # get breakpoint location
        breakpoint = thrower.direction_to_destination(thrower.direction, breakpoint_distance_from_thrower)

        # get shot time
        shot_time = shot_distance / shooter.velocity

        # get actual lead
        target_diff = cls.mph_to_fps(thrower.velocity) * shot_time

        # reverse direction
        reverse_direction = (thrower.direction + 180) % 360
        target_location = thrower.direction_to_destination(reverse_direction, target_diff, breakpoint)

        # find target distance from shooter at moment of trigger pull
        pull_x_diff = target_location[0] - shooter.position[0]
        pull_y_diff = target_location[1] - shooter.position[1]
        target_distance = math.sqrt(pull_x_diff**2 + pull_y_diff**2)

        # find lead in angle
        lead_angle = cls._get_angle_by_sides(shot_distance, target_distance, target_diff)

        # find lead in thumb widths
        lead_thumbs = cls.angle_to_thumbs(lead_angle)

        # find visual lead in ft
        visual_lead_ft = target_distance * math.sin(math.radians(lead_angle))

        return {
            'lead_ft': round(target_diff, 2),
            'lead_angle': round(lead_angle, 2),
            'lead_thumbs': round(lead_thumbs, 2),
            'visual_lead_ft': round(visual_lead_ft, 2),
            'breakpoint': breakpoint,
            'pullpoint': target_location,
            'shot_distance': round(shot_distance, 2),
            'target_distance': round(target_distance, 2),
            'trajectory': round(thrower.direction, 2)
        }
https://github.com/cranklin/clay-target-lead-finder
Of course since not all the triangles represented in this diagram are right triangles, I would have to utilize the law of cosines and law of sines to find certain distances as well as the angles.
Using my software, I conducted tests with the shooter shooting 1200 fps shot at a 0 degree angle at 41 mph crossing targets at varying distances. Here are the results of my tests:
{'shot_distance': 150.0, 'lead_ft': 7.52, 'pullpoint': (7.52, 150.0), 'lead_thumbs': 1.43, 'lead_angle': 2.87, 'breakpoint': (0, 150), 'target_distance': 150.19, 'trajectory': 270.0, 'visual_lead_ft': 7.52}
{'shot_distance': 120.0, 'lead_ft': 6.01, 'pullpoint': (6.01, 120.0), 'lead_thumbs': 1.43, 'lead_angle': 2.87, 'breakpoint': (0, 120), 'target_distance': 120.15, 'trajectory': 270.0, 'visual_lead_ft': 6.01}
{'shot_distance': 90.0, 'lead_ft': 4.51, 'pullpoint': (4.51, 90.0), 'lead_thumbs': 1.43, 'lead_angle': 2.87, 'breakpoint': (0, 90), 'target_distance': 90.11, 'trajectory': 270.0, 'visual_lead_ft': 4.51}
{'shot_distance': 60.0, 'lead_ft': 3.01, 'pullpoint': (3.01, 60.0), 'lead_thumbs': 1.43, 'lead_angle': 2.87, 'breakpoint': (0, 60), 'target_distance': 60.08, 'trajectory': 270.0, 'visual_lead_ft': 3.01}
Based on the results of my test, at 20 yards, 30 yards, 40 yards, and 50 yards, the leads were 3 ft, 4.5 ft, 6 ft, and 7.5 ft respectively. Even more interesting is that the lead angles for each of these shots were virtually the same at 2.87 degrees! To get a better understanding of how to visualize 2.87 degrees, I added a “angle_to_thumbs” conversion method which returns 1.43 thumbs. What does that mean? If you hold your arm straight out in front of you and put your thumb up, the width of your thumb is approximately 2 degrees based on this link. So imagine, 1.43 thumbs; That is your visual lead. (your thumb width may vary. Mine happens to be smaller than 2 degrees)
So far, all the calculations are correct, but there is one gaping flaw: The physics aspect is incorrect (or non-existent rather). These numbers apply if clay targets and shot didn’t decelerate and were not affected by air resistance and gravity. Unfortunately, they do. So how do we adjust these calculations to take drag into consideration?

where FD is the drag force, CD is the drag coefficient, ρ is the density of air, A is the cross-sectional area of the projectile, and v is the velocity of the target. The drag coefficient is a function of things like surface roughness, speed, and spin. Even if we found an approximate drag coefficient, to further complicate things, one cannot simply plug the values into the equation and solve. Since the velocity changes at each moment (deceleration), the equation must be rewritten as a differential equation to be useful.
This is where I stop and let the reader take over the problem. Here are some good resources on drag force and drag coefficient:
http://large.stanford.edu/courses/2007/ph210/scodary1/
http://www.physicsforums.com/showthread.php?t=9066
http://www.physicsforums.com/showthread.php?t=157817
http://www.physicsforums.com/showthread.php?t=696022
To conclude, I would like to add that this program still leaves much to be desired. For starters, targets rarely fly straight but rather in an arc. Some targets slice through air (chandelles) and almost maintains its horizontal velocity. Others bend and drop rapidly (battues). Some pop straight up and/or straight down, allowing gravity to dictate its rate of change in velocity. Compound leads haven’t been considered, nor the unpredictability of rabbits’ sudden hops. But still, this gives you a good idea of how crazy some leads are and how counterintuitive it can be when you’re attempting to hit them.
Suffering from burnout or stress? Step away from that computer and enjoy some fresh air at a local sporting clays course near you.
If you’re looking for a course around the Los Angeles area, I suggest you check out Moore-n-Moore Sporting Clays in Sylmar, CA. The staff is inviting and will happily assist new shooters. You may also catch Ironman shooting there. 😉


I love animals. I own two loving huskies and it hinders me from being away from home for too long. Since I became a dog owner, going out of town for even a few days meant finding a dog sitter or boarding. Yeah, it requires a lot to be a dog owner. That being said, for those occasional days where I have to be gone for a long time, I can just give my dogs extra large portions of food and water. They are smart enough to ration it out.
Fish on the other hand, are stupid. I mean, they are dumb. They can stuff themselves with so much fish food that they die.
I don’t own any fish, but I bought my niece fish for her birthday. Why? Because her mom (my sister) didn’t want a dog so my niece asked for the next best thing… a fish. I bought her a pretty little betta fish, a cool fish tank, and enough food and conditioner to outlast the fish. I don’t want to take care of a fish, but that was my sister’s problem. Right? Well, not exactly. A few weeks after I bought her the fish, their family went out of town for a month long vacation. Naturally, my sister asks, “oh Eddie, by the way, can you take care of the fish while we’re gone?”
Great… Just great. Why did I buy her a fish? It’s my niece’s first pet and I have to take care of it.
The problem with fish, as I have mentioned, is that you must feed it the right amount of food at the right time. 4-7 pellets twice a day. You can’t overfeed it or it will die. You can’t starve it or it will die. My own mealtimes are unusual and differ everyday. How am I supposed to remember a fish’s mealtime?
Something came up and I had to be away from the house for a good 24 hours. I wouldn’t be able to feed the fish. What was I to do? Take the fish with me? I just felt so… suffocated. I was on the phone with my girlfriend discussing this predicament. She suggested, “why don’t you just make a little robot that feeds the fish”. Silly idea… no wait… actually, that’s not a bad idea. Now, I don’t need to make a fish-feeding Wall-E, but I can rig up something VERY quick and simple! After all, it only needs to work for one meal. It would only be worth it if I could hack this together in 10 minutes or less…
So begins the build of my primitive little fish feeder:
First, I needed a servo. I dug through some of my electronic components and found my cheapest, weakest little servo.
I also needed to grab a spare Arduino, some wires, small paperclip, cardboard, and scotchtape.
Next, I took the paperclip and bent it and attached it to the servo.

Then, I took my piece of cardboard (actually the top part of an old green dot money pak card) and made a little siphon. Yeah, I really put my origami skills to the test.

I scotchtaped the cardboard siphon to the paperclip and wired the power to the 5v power source, ground to ground, and signal wire to pin 9 of the arduino board.


Finally, I coded up the software through the arduino SDK and uploaded it:
#include <Servo.h>;
Servo myservo;
int pos = 0;

void setup() {
  myservo.attach(9);
}

void loop() {
  for(pos = 0; pos < 90; pos += 1)
  {
    myservo.write(pos);
    delay(15);
  }

  delay(3000);

  for(pos = 90; pos > 0; pos -= 1)
  {
    myservo.write(pos);
    delay(15);
  }
  myservo.write(0);

  delay(43200000);
}
43200000 milliseconds = 12 hours. Once every 12 hours is perfect.
This took less than 10 minutes to hack together… but it may not be a bad idea to improve this fishfeeder and have it keep feeding the fish every 12 hours without me having to load the siphon with more fish food. I’m not sure if you’re familiar with hand-loading ammunition, but there’s a nifty little tool that allows you to set the perfect powder charge per casing. There is an interim chamber that adjusts to hold the perfect powder charge everytime you pull the handle up and down. Otherwise, you’d have to weight it for each case. A design similar to that would allow the robot to feed the fish perfectly without the need to count the pellets…

But then again, this would only be worth it if the efforts to enhance this fishfeeder doesn’t take too much time.
Sometimes, good things come from being lazy too… yes they do.
I’ve been offered generous pay to artificially increase the views on youtube videos to which I replied, “no thanks”.
When my friend entered an online contest that involved a video submission, I happily agreed to help him out by “boosting” his view count without any compensation. Why? Because I felt like it.
***** Full Disclaimer *****
I have never broken the law using my software. My bots have never been used for profit or self gain. This is purely educational and I denounce anybody that abuses this information to break the law.
Building the Video Views Bot
As a software engineer, part of your job is to be confident enough to build things you’ve never built before or solve problems you don’t yet know the answer to. This bot is no different. I have never “tricked” a youtube-like site into more views, but how difficult could it be? As long as I build a bot that behaves exactly like a human on a browser (but faster), it should be easy.
First, I viewed a full video on said video hosting site while logging packets. You can also use firebug which makes it easier. Then I inspected each of the packets. I don’t know what purpose some of these packets serve, but I decided it’s best to assume each of these are important. I kept a close eye for identifiers that are unique per pageload and strings of numbers that look like a timestamp of some sort. If the timestamp reveals that the user finished watching a 10 minute video in a split second, foul play might be suspected. When making the bot, I simply took every GET and POST request and simulated these actions using the curl library. For each of the requests that contained timestamps, I replaced the timestamp with a true timestamp, but padded with the time difference found in the original packet’s timestamp. This may be overkill and to make this work it may actually be much simpler, but I was thorough to be sure I wasn’t missing any crucial elements.
Coupled with the random browser agent generator I’ve made before, this bot is good to go.
Remember that most view counters will impose a limit per IP (usually higher than 1 since several computers can share the same WAN IP). Finding this upper bound is your job. I’ll talk more on circumventing this limitation later. Either way, just know I was able to feed it false video views like I was feeding chocolate cake to a fat kid.

Building the Vote Bot
The second part of this online contest (which shall remain unidentified) required actual user submitted votes. Each voter would have to enter their email address, then cast a vote. The voter is limited to one vote per 24 hour period. I began testing the site like I would any other; I captured packets. One thing I noticed was that the form buttons were not posting to an action page, rather triggering a jquery method. I found a javascript file that was being imported in the header called “main.js”. When I took a look at it, included all the voting methods. I discovered that everytime one submits a vote, an ajax request is called to validate the email address and check to see if that email address has voted once in the past 24 hours.
    function  validateVote()
    {
        $.ajax({
            url: '/api/set_vote/'+ encodeURIComponent($('#email').val())+'/'+ $('#candidate').val(),
            type: 'GET',
            dataType: 'html',
            success: function(data, textStatus, xhr) {
                $('#step1').hide();
                $('#step2').hide();
                $('#step3').fadeIn();
                $('#step4').hide();
            },
            error: function(xhr, textStatus, errorThrown) {
                console.log(errorThrown);
            }
        });
    }
It returns a boolean value; if the value is set to true, it makes yet another ajax request to submit the actual vote.
    function  submitVote()
    {
        var error = "";
        var email = $('#email').val();

        if( !validateEmail(email) )
            error = "INVALID EMAIL ADDRESS";

        if( !$("#conditions").is(':checked') )
        {
            error = "YOU MUST ACCEPT TERMS AND CONDITIONS";
        }

        if( !$("#policy").is(':checked') )
        {
            error = "YOU MUST ACCEPT PRIVACY POLICY";
        }

        if( !error )
        {
            $('#error').html("");

            $.ajax({
                url: '/api/check_email/'+ encodeURIComponent($('#email').val()),
                type: 'GET',
                dataType: 'html',
                success: function(data, textStatus, xhr) {
                    if( parseInt(data)==0 )
                    {
                        $('#step1').hide();
                        $('#step2 .voted').hide();
                        $('#step2 #vote_'+$('#candidate').val()).show();
                        $('#step2').fadeIn();
                        $('#step3').hide();
                        $('#step4').hide();
                    }
                    else
                    {
                        $('#step1').hide();
                        $('#step2').hide();
                        $('#step3').hide();
                        $('#usedemail').html($('#email').val());
                        $('#usedhours').html( Math.ceil((parseInt(data)/3600)) );
                        $('#step4').fadeIn();
                    }
                },
                error: function(xhr, textStatus, errorThrown) {
                    console.log(errorThrown);
                }
            });

        }
        else{
            $('#error').html(error);
        }
    }
Now that’s just stupid.
Since the ajax request is made to an “api.php”, I decided to test that out. I called this file while purposely denying it of any expected parameters and it returned a really bad error message… straight from their MySQL to my web browser.
A PHP Error was encountered

Severity: Warning

Message: Missing argument 2 for Api::set_vote()

Filename: controllers/api.php

Line Number: 117
A PHP Error was encountered

Severity: Notice

Message: Undefined variable: candidate

Filename: controllers/api.php

Line Number: 127
A Database Error Occurred

Error Number: 1048

Column 'vote_value' cannot be null

INSERT INTO `vote` (`vote_email`, `vote_ip`, `vote_value`, `vote_date`, `vote_shared`, `vote_fbid`) VALUES ('mike@gmail.com', '10.10.10.10', NULL, '2013-06-03 06:42:29', '', '0')

Filename: /var/www/microsite/[removed]/models/vote.php

Line Number: 63
Programmers, please don’t do this. I understand that many programmers are not sysadmins and vice versa, but it doesn’t take much to edit that php.ini and change the error reporting value to something less revealing. By looking at this, I was able to see exactly which bits and pieces of data they were collecting. To top it off, each vote is submitted via an HTTP GET request. Look, I understand if you don’t follow all of the HTTP protocol and use DELETE or PUT, but GET for votes? Your browser is sending your email address as part of the URI. Come on!
So I was able to craft up a voting bot really quick. I used it to submit a couple hundred votes and noticed it limited me to 50. There were no cookies, I used my unique browser agent generator, and it still limited me to 50. I knew right away it was an IP limitation.
Circumventing IP Limitations
One cannot simply “spoof” their source IP because the IP info is too deep in the TCP layer and it would break the three-way handshake. You can go about this a few ways:
1) Use proxies
2) Utilize a botnet (if you have access to one).
3) Drive around town with your laptop and wardrive open wifi networks.
4) Launch a bunch of instances on the Amazon EC2 and use IPs from their pool.
*yoda voice* No. There is another….
Yes, I figured out another way to utilize more IPs. Since this lame online contest used GET requests, I was able to write a small PHP snippet that generated random emails and launch N number of invisible iframes that automatically pull up the magic URI. By embedding this small snippet of PHP code into another website (preferably with a decent amount of traffic), I have managed to crowdsource the votes.
I call these bots “crowdsource bots”.
I’m not saying this is ethical, but it’s not illegal either… just frowned upon. Even if the contest voting submitted POST requests (like it should), I could still use this method (with an additional step of course). CSRF protections prevent automatic cross-domain POST requests, but you can overcome this by simulating a human mouse click via javascript.
In the end, it was super easy getting my candidate to gain the most views and the most votes. However, the human element (the powers that be) dictated that my candidate did not win.
I’m not saying bots are superior to humans; they are not. Nevertheless, bots rule the world. They perform human tasks infinitely quicker and more efficient. Isn’t that what software is all about – speed and efficiency? Those that take advantage of bots come out on top. My friend Eric Kim introduced me to the world of financial trading. He forwards me articles about high frequency trading and how bots control the market. (This is an area I would like to explore in the future). If we engage in cyber warfare, guess who’s on the front line? Bots. Arguably, I think most of our simpleton, overpaid politicians can be replaced by bots. We can replace our entire executive branch and congress with bots.
senator1.py, senator2.py, houserep1.py, houserep2.py, president.sh, vicepresident.bat
These bots would not fall under temptation. They would be fair. They would not engage in scandals. They would not play partisan politics. They would not spend wastefully. They would save taxpayers a LOT of money.
Just saying…

We have witnessed lots of new websites and mobile apps sprouting out of this tech bubble; many of which are built by inexperienced developers or developed in a hurry by the impatient entrepreneur. Consequently, we hear too frequently that some website was hacked or that a server holding sensitive data was compromised. Most of us brush it off with a “Whew! It didn’t happen to me.” Well, how many websites or services have you joined? How many of these sites/services share the same password? I’m pretty sure you don’t have a unique password for each site or service you signed up for. How many of these dot coms store your personal information? It should be a concern. This is why I’m hesitant to register for that trendy new silicon valley startup dot com; I cringe at the lack of security practices employed by many developers. The negligence is almost criminal. Displaying a GoDaddy secure logo or McAfee secure seal doesn’t mean crap. This false sense of security stems from the fact that the site complies with some arbitrary checklist of common exploits (eg. XSS, SQL injection).
I don’t claim to be an expert in security, but allow me to share some cryptosystem basics with you.
Passwords
This is where you use a cryptographic hash function to encrypt (or hash, rather) your passwords. Hash functions go one way… meaning once you encrypt your password, your password cannot be “decrypted” back into plain text. Enc(Plaintext)->Cipher exists, nevertheless Dec(Cipher)->Plaintext does not. When a user logs in, hash the entered password and compare the new hash with the old hash that you have stored.
However, there is a problem. Running php -r "echo md5('password');" returns 5f4dcc3b5aa765d61d8327deb882cf99. I can run it 100 times and it will always return that value. I now know that a hash of 5f4dcc3b5aa765d61d8327deb882cf99 means the plain text version of the password is “password”. With a few lines of code, I can create a script that brute forces a md5 hash of every alphanumeric combination and store each of those hashes in a table. This is also known as a “rainbow table”. A rainbow table makes it very easy to reverse lookup a hash and return the unhashed text. So by storing “5f4dcc3b5aa765d61d8327deb882cf99” in your rainbow table, next time you run across that hexadecimal, you now know it equates to the plain text “password”. To protect against rainbow table attacks, use a salt. What is a salt? md5("thisisasalt"."password") That is a salt. It’s an arbitrarily long string that is prepended to the password before it is hashed.
MD5 isn’t known to be a secure cryptographic hash function and is not recommended. I have heard of hackers utilizing cloud computing to unhash MD5 passwords in a matter of seconds. Instead, use Bcrypt. Not only does Bcrypt implement a salt, you can increase the iterations to make it slower by (2^n). In other words, it adapts to the times and makes it very difficult to brute force despite the increase in processing power. But no matter what, always enforce long alphanumeric passwords that aren’t in the dictionary. This will make your password very difficult to brute force.
Sensitive Data (transport)
Do you recall middle school? Imagine you are in a classroom and you want to pass a sensitive letter to your friend sitting across the room. What can you do to ensure that only your friend can read the message? This is similar to entering credit card information to make an online purchase. I’ve demonstrated how easy man-in-the-middle attacks are in previous blog posts and we want to prevent anybody but the recipient from reading our message. If you encrypt the message with a symmetric cryptographic function, sure your recipient will be able to decrypt the message but at some point, it would have been necessary for you to agree upon a key.
encrypt(message,key)->ciphertext

decrypt(ciphertext,key)->message
Passing a note with an encrypted message along with the key is not safe for obvious reasons. This is where “asymmetric cryptographic functions” are useful…. or Public-key encryption. When you log onto a banking website or an ecommerce site, your browser SHOULD always display a lock icon to let you know that public-key encryption has been enabled. How does public key encryption work? Each party has 2 keys: A private key and a public key. The public key can only encrypt and the private key can only decrypt. You allow everybody access to your public key but NOBODY should be able to access the private key except yourself. Let’s say the names of the two friends are Alice and Bob. Each has a public key and a private key. It would go something like this. Alice passes her public key to Bob. Bob encrypts his message with Alice’s public key. Encrypt("message", Alice's public key) -> cipher. Bob has now generated a cipher which only Alice can decipher. Bob passes the cipher to Alice. Alice decrypts the message with her own private key. Decrypt(cipher, Alice's private key) -> message! This is how public key encryption works. Here is an interesting fact: The security surrounding today’s most commonly used public key encryption is based on the difficulty of factoring the product of two very large prime numbers. What??? Yes. Think about how hard it is to factor the product of two large prime numbers. There is no easy systematic approach. Now you know why engineers and mathematicians go nuts over the discovery of insanely large prime numbers!
Sensitive Data (storage)
I remember reading an announcement from a hacker group called “antisec” bragging about breaking into the specialforces.com website and stealing passwords and credit card information. They mentioned that the information was encrypted using Blowfish encryption (which is a very strong symmetric cryptosystem).
BFencrypt(message,key) -> cipher

BFdecrypt(cipher,key) -> message
Now, I can guarantee that they didn’t “crack” the cryptosystem or find a flaw in the encryption algorithm. No, they found the key which was apparently lurking in the system as well. I don’t think I need to explain the stupidity of that. I mean, you can buy a brand spanking new, state of the art LOCK for your door, but if you leave the key in the lock, it’s pretty useless. It’s like having an unbreakable combination lock that has a sticker on the clasp with the combination written on it.
Your lock is only as good as the key (or where you store the key). If you’re storing your customers’ sensitive information, 1) pick a strong symmetric cryptosystem. 2) select a key that is unique to each user, and 3) do NOT store the key in your database or within your codebase.
Personally, I accomplish this by encrypting their data with their plaintext password or hashed password as the key (using any type of hash besides bcrypt hash). Since the password is not stored in my DB in plaintext (or decipherable ciphers) and the key is unique per customer, it would be virtually impossible to retrieve the password therefore virtually impossible to decipher the sensitive data. When the customer is on the site and must access this information, all I need to do is re-prompt the customer for his/her password and use that string to decrypt the respective data. Following me?
DB contains Bcrypt(password) and BFencrypt(message,password) or BFencrypt(message,someotherhash(password)).
Developers and CEOs, please take these precautions. Security should always be first. Your users trust you to hold their data, therefore YOU are responsible. Obfuscation is NOT security.
If and when some genius proves (or disproves) the Riemann hypothesis and then discovers a non-brute-force method of finding prime numbers, the entire world’s security will be at risk and I shall update this post. Until then, stay safe.
Engineers, stay agile.
I became a software engineer for many reasons. I love to code. I love to create. I love solving puzzles. I love exploring different technologies. I love the rewards. I chase the knowledge. I desire to make a difference.
Chances are, you do too.
You may have become a programmer for the very same reasons I did. But allow me to raise a few questions:
Are you really doing what you love? Are you being challenged mentally? Are you chasing the knowledge? Are you truly on your way to making a difference?
If your honest answer is “yes”, I am happy for you. For everyone else, you are not alone.
Doing what you love: code, create, solve problems, explore different technologies
As a software architect, most job opportunities come with a verbal promise of “freedom to build the product the way you want to do it”. Additionally, there will be “many opportunities to explore different technologies as the business expands into this and that”.
The latter is utter BS. The first is a catch-22 type BS. Isn’t it funny how even the CEO knows that the engineer’s dream job is doing R&D and will try to make his/her company appear like one?
Look. I appreciate the “freedom”, but let’s be real. I’m not hired to build the product in that functional programming language I am dying to try out. No. I’m being hired to build it with the technologies I’m most experienced with (and consequently, bored to death of). And IF the company is fortunate enough to “expand”, they will want me to stay right where I am “manning the station” THEY feel most comfortable with. After all, the goal is to build a well-oiled machine while the engineers (and other employees) act like the hamsters spinning the wheels. Before you know it, you’ve spent a good chunk of your life learning nothing and being a tool.
Challenging yourself mentally
Let’s face it. We all interpret “challenging” differently. For an engineer, a challenge would be to figure out how to improve an algorithm’s efficiency by an order of magnitude. A challenge would be to figure out how to scale your architecture to handle enterprise level traffic without going over budget. A challenge would be to write software that can analyze images for an autonomous vehicle.
Your employer on the other hand, thinks you’re being challenged because you are given a deadline of 4 weeks to build a social networking site. They think you’re being challenged because you are expected to work 16 hours a day / 7 days a week.
Chasing the knowledge
You are a curious individual. I know you love to learn new things. So when did you last pick up something new? What was the last book you read? Does your job give you time to study and read? Know this. As engineers, if you don’t keep up with the latest technological trends, your value diminishes. Staying stagnant is the same as moving backwards. Do you know any Pascal or VB6 programmers? Lotus 1-2-3, Quattro Pro, WordPerfect experts? Coldfusion developers? Corel Draw designers? I can brag about being able to redefine your keyboard while performing a dedicated print over a BBS chat room if you load ansi.sys in your config.sys… but who cares? It’s irrelevant now. Yeah. Unless you do something about it, you too will expire.
Making a difference
You’re probably working on something cool. There may be similar products out there but they lack this feature and that feature, right? You’ve perfected your 30 second elevator pitch in case somebody asks you what you’re working on and you generally receive positive feedback. But is your contribution to this product really going to make a difference in this world? While on your deathbed, will you look back and be proud of this thing you built? Or is it just another gimmicky website or iphone app that will likely lose its value in a couple years?
Staying agile…
I understand you need to make a living, but I don’t think any job is worth sacrificing your own growth. I am a workhorse. I have spoiled my employers by pulling the weight of several engineers while being underpaid. I have spoiled my employers by working nights and weekends and forfeiting vacations (while they traveled the world). I have spoiled my employers by taking ownership of my work even though I own nothing but a few insulting stock options. Don’t fall victim to the smooth talking businessman/woman who entices you to make his/her ideas come to life while your own life’s priorities take a back seat. They have glorified the workaholic engineering lifestyle… the redbulls and hackathons…
Ha! Screw hackathons. We don’t throw business people into a little room and reward them with redbulls and T-shirts while they stay up all weekend to make money for us.
Listen. I love working on startups and I’m sure you do too. But get one thing straight: If you’re not the owner of your company, you have a job. Treat it as such. Meanwhile, invest some time into your own life and maintain your worth. Stay agile.
Lateral career movements are sometimes the only way for you to better yourself and keep your work from turning stale.
I prefer sabbaticals. During my occasional sabbaticals, I disappear from the workforce and read books, learn new things, build pet projects, etc.
… and I always return stronger.
I was working on an interesting short term project through Project C for an upcoming movie called Oblivion.
How it works:
Basically, users contribute their favorite memories of Earth via Twitter and/or Instagram hashtagged with #oblivionmemory. If the tweet or photo includes your geolocation, it is automatically placed on a global map. The map at first glance appears cold, dark and desolate, but as user contributions are added, it begins to brighten, state by state, country by country. At the end of the campaign, the map will have transformed into a bright beautiful landscape of the world, as if these precious memories have revived the Earth back to life from Oblivion. (as Matthew Jordan so delicately explains)


This sounds simple enough but it presents a couple challenges. First, after aggregating tweets and photos, how does one convert those geocodes to cartesian coordinates? How do you take the longitude / latitude pairs and find the corresponding pixel on a given map?
In the programming world, given a particular viewport, the origin usually starts in the upper left corner while the x and y values increase as you move towards the bottom right. For this reason, I don’t like the fact that people still call it “cartesian coordinates”. I’m not a mathematician but technically speaking, the correct terminology should be “the absolute value of quadrant IV in the cartesian coordinate system”. Would it not? Anyhow, I’ve accomplished this conversion by performing a few steps:
1) Find the top left and bottom right corners (in pixels) on the map.
2) Find the corresponding geographical coordinates for each of these points.
3) Adjust the longitudes and latitudes (separately) so that their origin is also placed in the upper left corner (using only addition/subtraction and absolute value math).
4) Represent max and min values for both longitude and x values in slope intercept form (y=mx+b)
5) Solve for m and b
6) Repeat steps 4 and 5 for latitude and y values.
Now that I have m and b (slope and y-intercept) for longitude (x) and latitude (y), all I have to do is plug any longitude and latitude into their respective formulas and it will yield the corresponding x and y values.

Now that I can systematically generate xy coordinates for each geocoded post, I need to figure out a way to make the map turn from grayscale to color only in these areas. The way accomplished this was to take a grayscale map and layer it on top of a color map. Next, I would “punch holes” into the top layer exposing pieces of the color map below. These crop circles can be easily generated through GD doing something like this:
imagefilledarc($img, $x, $y, $diameter, $diameter, 0, 360 $transparent, $srcimage, IMG_ARC_PIE);
The rest is easy stuff. 🙂
The site can be viewed at www.earthisamemory.com (due to moderation, posts will not appear on the map instantly)
 I noticed a bunch of my friends were playing a game called “Candy Crush”. I’m not much of a gamer nor do I have time to waste on games, but I had to see what the hype was all about. I mean, this game went viral and I want to know what they did right. So I played it. It certainly is fun. I played it for 6 days and reached level 105. Cool, but there are currently 305 levels and I don’t wish to waste any more time on this game. I got curious, so I started logging tcp packets sent back and forth to king.com through the flash client. I found a few interesting bits of information.
First, when I put my cursor over any of the beaten levels, I get a little popup image of that level. Each time I do this, I see the flash client making a GET request to
https://cc1.midasplayer.com/images/levels/XXX.png
(replacing XXX with the level number). Using wget or your browser, you can preview any level you like. For example,
https://cc1.midasplayer.com/images/levels/320.png
will show you level 320 (which doesn’t even exist yet).
Second thing I noticed, the flash client polls https://candycrush.king.com/api/poll and GETs a JSON encoded string with some interesting data:
{“currentUser”:{“userId”:XXXX,”lives”:1,”timeToNextRegeneration”:1780,”gold”:0,”unlockedBoosters”:[],”soundFx”:true,”soundMusic”:true,”maxLives”:5,”immortal”:false, “mobileConnected”:true}}
This data tells your client who you are, how many lives you have, sound settings, max lives….. and immortal? Woah. It appears the good folks at King have a secret setting called “immortal” (which of course defaults to false). How does one set “immortal” to true? Well, you can get creative. The idea is to deceive your browser and send it phony data. One possible solution is to add an entry to your hosts file or nameserver and point to an alternate server. Another method is to run a MITM attack on yourself and create a custom filter that alters the number of lives, number of max lives, and your immortal status. In case you haven’t noticed, it’s an encrypted request. So how would we bypass that? Well, ettercap can re-sign the packet with its own SSL cert (which would trigger a browser warning) but you can simply add the certificate to your exceptions list. All you need to do is edit /etc/etter.conf and uncomment the appropriate lines for your operating system. Since I am using Linux, I uncomment:
redir_command_on = "iptables -t nat -A PREROUTING -i %iface -p tcp --dport %port -j REDIRECT --to-port %rport"

redir_command_off = "iptables -t nat -D PREROUTING -i %iface -p tcp --dport %port -j REDIRECT --to-port %rport"
and I set:
ec_uid = 0

ec_gid = 0
The third thing I noticed while running a MITM attack on an Ipad was that the mobile app version does not use SSL when calling the API. That makes it even easier to hack than the facebook app.
Finally, the simplest way to hack Candy Crush (or any other Flash based software) is to tamper with the data in memory. There is a nifty little tool that you can use for this: scanmem. On Ubuntu, you can simply run sudo apt-get install scanmem
to install it. To explain scanmem, it’s a dumbed down version of a hexadecimal editor that allows you to scan/locate/modify areas in memory used by a local process. It reminds me of the 90’s when I used to crack copy protection from video games armed with nothing but a debug and zipzap (or gdb and hexedit on linux). The reason why I say it’s dumbed down is because it does all the difficult tasks for you. I can walk you through the cheating process.
1) get the PID for your browser/flash player. If you use firefox: ps aux |grep flash should return the process ID.
2) run scanmem sudo scanmem
3) select the process from scanmem’s prompt: pid [process ID]

4) pinpoint the section of memory that contains the bit of data you are looking for. If you are trying to give yourself more moves on a certain level, take a look at the number of moves you have left, and enter it in the prompt. For example, if you have 30 moves left, enter 30 at the prompt. It will likely find way too many matches to be useful. But that’s okay because scanmem tracks each of these memory locations for you. Make another move on the game so you have 29 moves left. Now return to the scanmem prompt and enter 29. The number of matches will reduce. Repeat the process until it returns 2 matches. Now you’ve pinpointed it!
5) change the value in memory. At the prompt, you type: set 200
and it will give you 200 lives.

6) reset scanmem. If you’re trying to track a different value or the number of moves on a different level, simply type: reset.
(before running the hack)

(after running the hack… note the number of moves left)

Yes. It’s that simple. Back in the 90’s, I would have a notebook full of addresses that I considered “areas of interest” and use the process of elimination to pinpoint the right value. *sigh. Kids these days have it easy. If you’re planning on hacking candy crush, this might prove useful:
– number of moves: 2 matches
– bomb timers: 2 matches per bomb
– score: 4 matches
– checklists: 1 match (but not the value they show you on the screen. The game shows you the number of matches you have left to pass the level. In memory, it is stored as the number of items you have already destroyed: [Number of items needed to pass]-[Number of items you have left])
Enjoy!


I like Instagram. I can do a hashtag search of “chevy” or “silverado” and stare at trucks all day. The problem is, I don’t have the time. I wish I could be more active on Instagram, but that is a luxury I do not have. If only I could automate my Instagram activity…
If only…
Ha! Are you kidding me? You bet I can automate my Instagram activity!
I want to create a bot that searches specific hashtags and likes each photo. Instagram has a web interface for viewing profiles, liking, and commenting. However, it is limited because it doesn’t allow you to search hashtags. That’s okay though. There are several independent websites that utilize the Instagram API to allow users to browse Instagram photos online; I can just abuse one of those.
First, I needed to choose one of the several Instagram web viewers: web.stagram.com, webstagr.am, ink361.com, statigr.am, etc etc. I picked web.stagram.com because there is minimal ajax and that makes my life easier.
Next, I needed to do some http post/get recon work like I did for the Facebook bots. Firebug proves very useful here.
I decided to write this bot in Python using the pycurl library. It didn’t take very long to build (a couple hours while watching TV?). First I tried running it against these hashtags: “linux”, “silverado”, “chevy”, “z71”. The bot did what I expected and liked all of the photos I would normally like. Nice! But then I started getting a little greedy and wanted to engage a lot more Instagramers (instagrammers?). So I looked for a list of the most popular Instagram hashtags. Here is a snippet of the list:
1.  #love (+)   100,106,232 photos

2.  #instagood (+)  72,788,208 photos

3.  #me (+)     56,885,413 photos

4.  #cute (+)   53,136,368 photos

5.  #photooftheday (+)  52,173,843 photos

6.  #tbt (+)    51,407,782 photos

7.  #instamood (+)  48,298,484 photos

8.  #iphonesia (+)  40,101,981 photos

9.  #picoftheday (+)    39,740,152 photos

10.     #igers (+)  39,234,496 photos

11.     #girl (+)   38,888,469 photos

12.     #beautiful (+)  38,754,532 photos
If I run each of these hashtags through my bot, I can engage a LOT of people! So I did exactly that…

It worked well. A little too well. I took a look at the list of “photos I liked”. With no discretion whatsoever, my bot liked everything! Not only did it like photos of scantily clad women (oops?), but it liked photos of topless men (wth!), and photos of underage girls and boys (Yikes! Why the heck are you kids on Instagram?). Oops… I swear it wasn’t me! It was my bot!

Now I feel like a creep. If I keep running the bot, I suppose I can gain lots of new followers… but at what cost? Looking like a creep. Is it worth it? Maybe.
I invite you to check out the source code if you’re looking to build and study bots. Download from github. Please don’t abuse this bot. The truth is, I like Instagram and I don’t want it to be saturated with spammers.
Update:
Instagram didn’t find my bot too amusing. They disabled my account and removed all my photos. Yes, I have the the direct URI for some of my Instagram photos (on S3) and even those stopped working. So… just a fair warning: If you’re trying to run this bot to get followers, you may end up losing your account. I only ran this bot for a full 2 days (and I was gaining 1-200 followers a day) before my account was disabled.

So my @cranklin account is gone and I’m starting from scratch with @crankerson 😦


You can’t beat me in a Facebook poke battle. Here’s why…
I have been way too busy and it sucks. It sucks because:
Too much work means no free time
No free time means no time for fun little projects
No fun little projects means I go crazy
Going crazy means I can’t get work done
It’s a vicious cycle.
So what do I do while I suffer from coder’s block? I waste a good amount of time zoning out on Facebook.
The Conception
One of the most annoying Facebook features are the stupid/pointless pokes. After wasting a good 30 minutes on an intense back and forth poke battle, I decided it would be a good idea to make a poke bot. Can you imagine that? I could be drifting away in my swimming pool while my bots win all my poke battles for me!

The lack of enthusiasm only reassured my itch to build a nuclear facebook poke bot.
I have always shied away from making Facebook-related bots because Facebook works hard to prevent bots and I hear that Facebook bots are difficult to make. Oh well. Time to overcome my fears.
Hacking Facebook
First, I look at the Facebook page that gives me the list of all the people that poked me. That would be:
https://www.facebook.com/pokes?notif_t=poke
Next, I examine the “poke back” link. The links aren’t much help to me since Facebook “ajaxifies” the link. So, I fire up Firebug to examine the GET or POST requests my browser makes when I click “poke back”. Firebug reveals that it is a POST request to https://www.facebook.com/ajax/pokes/poke_inline.php with these parameters:
    __a = 1
    __user = 556970868
    fb_dtsg = AQC_K43G
    nctr[_mod] = pagelet_pokes
    phstamp = 1658167957552517190
    pokeback = 1
    uid = 1011739365
While logged into Facebook, I open up a new tab with a quick and dirty HTML form that posts to that URL with these parameters as hidden inputs. It works! Cool.
Next, I do the same Firebug probe on the homepage so I can find the necessary POST parameters to log into Facebook. To log into Facebook, Firebug shows me that I need these parameters:
charset_test    €,´,€,´,水,Д,Є
default_persistent  1
email   email
lgnjs   1352019805
lgnrnd  010313_fdAk
locale  en_US
lsd AVq9lE5u
pass    password
persistent  1
timezone    480
Now, some of these values are dynamically generated, so the bot would first need to scrape and populate the post parameters before it can post. A similar process would be necessary to do the actual poking.
The Build
All I had left was to put it together. Here is the source code:
<?php
// your facebook credentials
$username = "email";
$password = "password";

// access to facebook home page (to get the cookies)
$curl = curl_init ();
curl_setopt ( $curl, CURLOPT_URL, "http://www.facebook.com" );
curl_setopt ( $curl, CURLOPT_FOLLOWLOCATION, 1 );
curl_setopt ( $curl, CURLOPT_RETURNTRANSFER, 1 );
curl_setopt ( $curl, CURLOPT_ENCODING, "" );
curl_setopt ( $curl, CURLOPT_COOKIEJAR, getcwd () . '/cookies.txt' );
curl_setopt ( $curl, CURLOPT_USERAGENT, "Mozilla/5.0 (Windows; U; Windows NT 6.0; en-US; rv:1.9.2) Gecko/20100115 Firefox/3.6 (.NET CLR 3.5.30729)" );
$curlData = curl_exec ( $curl );
curl_close ( $curl );

// do get some parameters for login to facebook
$charsetTest = substr ( $curlData, strpos ( $curlData, "name=\"charset_test\"" ) );
$charsetTest = substr ( $charsetTest, strpos ( $charsetTest, "value=" ) + 7 );
$charsetTest = substr ( $charsetTest, 0, strpos ( $charsetTest, "\"" ) );

$default_persistent = 1;

$lgnjs = time();

$lgnrnd = substr($curlData, strpos($curlData, "name=\"lgnrnd\""));
$lgnrnd = substr($lgnrnd, strpos($lgnrnd, "value=")+7);
$lgnrnd = substr($lgnrnd, 0, strpos($lgnrnd,"\""));

$locale = substr ( $curlData, strpos ( $curlData, "name=\"locale\"" ) );
$locale = substr ( $locale, strpos ( $locale, "value=" ) + 7 );
$locale = substr ( $locale, 0, strpos ( $locale, "\"" ) );

$lsd = substr ( $curlData, strpos ( $curlData, "name=\"locale\"" ) );
$lsd = substr ( $lsd, strpos ( $lsd, "value=" ) + 7 );
$lsd = substr ( $lsd, 0, strpos ( $lsd, "\"" ) );

$persistent = 1;

$timezone = 480;

// login to facebook
$curl = curl_init ();
curl_setopt ( $curl, CURLOPT_URL, "https://login.facebook.com/login.php?login_attempt=1" );
curl_setopt ( $curl, CURLOPT_FOLLOWLOCATION, 1 );
curl_setopt ( $curl, CURLOPT_RETURNTRANSFER, 1 );
curl_setopt ( $curl, CURLOPT_POST, 1 );
curl_setopt ( $curl, CURLOPT_SSL_VERIFYPEER, false );
curl_setopt ( $curl, CURLOPT_POSTFIELDS, "charset_test=" . $charsetTest . "&locale=" . $locale . "&email=" . $username . "&pass=" . $password . "&lsd=" . $lsd . "&default_persistent=" . $default_persistent . "&lgnjs=" . $lgnjs . "&lgnrnd=" . $lgnrnd . "&persistent=" . $persistent . "&timezone=" . $timezone);
curl_setopt ( $curl, CURLOPT_ENCODING, "" );
curl_setopt ( $curl, CURLOPT_COOKIEFILE, getcwd () . '/cookies.txt' );
curl_setopt ( $curl, CURLOPT_COOKIEJAR, getcwd () . '/cookies.txt' );
curl_setopt ( $curl, CURLOPT_USERAGENT, "Mozilla/5.0 (Windows; U; Windows NT 6.0; en-US; rv:1.9.2) Gecko/20100115 Firefox/3.6 (.NET CLR 3.5.30729)" );
$curlData = curl_exec ( $curl );
//echo $curlData;


// enter infinte poke loop
while(true){
    $curl = curl_init ();
    curl_setopt ( $curl, CURLOPT_URL, "https://www.facebook.com/pokes?notif_t=poke" );
    curl_setopt ( $curl, CURLOPT_FOLLOWLOCATION, 1 );
    curl_setopt ( $curl, CURLOPT_RETURNTRANSFER, 1 );
    curl_setopt ( $curl, CURLOPT_ENCODING, "" );
    curl_setopt ( $curl, CURLOPT_COOKIEFILE, getcwd () . '/cookies.txt' );
    curl_setopt ( $curl, CURLOPT_COOKIEJAR, getcwd () . '/cookies.txt' );
    curl_setopt ( $curl, CURLOPT_USERAGENT, "Mozilla/5.0 (Windows; U; Windows NT 6.0; en-US; rv:1.9.2) Gecko/20100115 Firefox/3.6 (.NET CLR 3.5.30729)" );
    $pokeData = curl_exec ( $curl );
    //echo $pokeData;

    preg_match_all("/<div class=\"pokeHeader fsl fwb fcb\"><a href=\"(.*?)\" data-hovercard=\"\/ajax\/hovercard\/user.php\?id
=([0-9]*)\">([^<]*)<\/a> has poked you.<\/div>/",$pokeData,$matches,PREG_SET_ORDER);

    if(sizeOf($matches)){
        $userid = substr ( $pokeData, strpos($pokeData, "\"user\":") + 8);
        $userid = substr ( $userid, 0, strpos($userid, "\""));

        $fb_dtsg = substr ( $pokeData, strpos ( $pokeData, "name=\"fb_dtsg\"" ) );
        $fb_dtsg = substr ( $fb_dtsg, strpos ( $fb_dtsg, "value=" ) + 7 );
        $fb_dtsg = substr ( $fb_dtsg, 0, strpos ( $fb_dtsg, "\"" ) );

        //echo $userid." ".$fb_dtsg;

        foreach($matches AS $val){
            //echo $val[0]."\n";
            //echo $val[1]."\n";
            //echo $val[2]."\n";
            $uid = $val[2];
            $curl = curl_init ();
            curl_setopt ( $curl, CURLOPT_URL, "https://www.facebook.com/ajax/pokes/poke_inline.php" );
            curl_setopt ( $curl, CURLOPT_FOLLOWLOCATION, 1 );
            curl_setopt ( $curl, CURLOPT_RETURNTRANSFER, 1 );
            curl_setopt ( $curl, CURLOPT_POST, 1 );
            curl_setopt ( $curl, CURLOPT_SSL_VERIFYPEER, false );
            curl_setopt ( $curl, CURLOPT_POSTFIELDS, "__a=1&nctr[_mod]=pagelet_pokes&pokeback=1&__user=" . $userid . "&fb_dtsg=" . $fb_dtsg . "&uid=" . $uid);
            curl_setopt ( $curl, CURLOPT_ENCODING, "" );
            curl_setopt ( $curl, CURLOPT_COOKIEFILE, getcwd () . '/cookies.txt' );
            curl_setopt ( $curl, CURLOPT_COOKIEJAR, getcwd () . '/cookies.txt' );
            curl_setopt ( $curl, CURLOPT_USERAGENT, "Mozilla/5.0 (Windows; U; Windows NT 6.0; en-US; rv:1.9.2) Gecko/20100115 Firefox/3.6 (.NET CLR 3.5.30729)" );
            $pokeresults = curl_exec ( $curl );
            echo "You poked ".$val[3]."!\n";
            //echo $pokeresults;
        }
    }
    empty($matches);
}
?>
Download my nuclear poke bot from git

Let me tell you, this bot is fast and obnoxious! Unlike the other lame poke bots you may find, this one is fast, it’s standalone, and it runs via command line. It will keep checking your poke notifications page. If somebody pokes you, it will immediately poke them back and notify you of whom you poked. I left it running all day. When I checked my computer and looked at the logs, I was able to see which of my poor friends were tenacious enough to put up a fight.

If you see this, it means you’re screwed.
Looking ahead… A simple alteration will allow me to poke bomb ALL of my friends. I may write a Python version, install it on my raspberry pi, and carry around a portable nuclear poking machine. 🙂
In the end, was the 2 hours spent on developing this bot a waste of time? No. It was just what I needed to pull me out of this coding slump. Plus, I can now outpoke ANYBODY. 🙂
Winning!
